FUNDAMENTAL PROCEDURES IN GOLD FOIL OPERATIONS
GEORGE A. ELLSPERMAN,
D.D.S.
620 HERALD BLDG. BELLINGHAM,
WASHINGTON
Read before the American Academy of Gold Foil Operators
Meeting, New Orleans, La., Nov. 1, 1957.
Received for publication Nov. 27, 1957
THERE IS A RAPIDLY growing interest in gold foil and an urge
on the part of many good operative dentists to obtain greater knowledge and
skill regarding its use. Articles have been written on the virtues of gold
foil, the use of the rubber dam, certain variations in gold foil cavity
preparations, and the condensing of gold foil. In this article, I intend to
stress the basic fundamental procedures embracing teamwork, instrumentation;
standardization of cavities, condensers, and the condensing of gold foil. It is
only after these fundamental procedures are fully understood and executed with
skill that we are in a position to make changes such as minimizing labial
outlines or variations in methods of condensing gold foil.
THE RUBBER DAM
Nothing is more fundamental in gold foil procedures than the
use of the rubber dam. As a component part of the overall operation, the rubber
dam technique should be so standardized that the teamwork between the assistant
and the dentist becomes a flowing of steps. Each movement of one coordinates
with that of the other. In this manner, the rubber clam is placed every time so
that it covers the same number of teeth for a given operation. For example,
when a gold foil restoration is to he placed in any of the four anterior teeth,
the rubber clam would be placed on all teeth from cuspid to cuspid. For these
restorations in the cuspid or bicuspids, the rubber dam would be placed on all
teeth from the first molar to the central incisor. Other than this, the rule is
that the rubber dam be carried to the tooth distal to the one being operated.
It is basic to use a ten one-thousandth thickness of rubber
clam, 6 inches square. This weight of rubber dam is designated as extra heavy,
and it is slightly more difficult to pass between the contact areas than a
light rubber dam would he. A firm stretching of the rubber, together with the
passing of the ligature, one lip of the rubber dam preceding through the
contact, makes the operation most simple. However, the advantage over the light
or medium is startling. There will be no folds, and the steady pull on the
gingival tissue in the embrasure permits the proper placing of the gingival
cavity outline. The invagination of this heavy dam around the teeth maintains a
tight seal. In short, the entire operating field leaves little to be desired.
RUBBER DAM CLAMPS
The standardization of rubber dam clamps has been badly
abused. Many dentists have tried to use too many clamps. Trial and error
procedures have resulted in wasted time and money. In my hands, the best
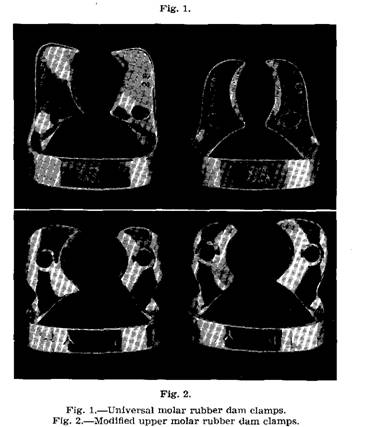
universal rubber dam clamp for upper molars is the S. S. White No. 18 (Fig. 1).
While it can be used as a splendid universal clamp, in most cases, there are
times when it will not balance due to the fact that both jaws of the clamp are
the same shape. Two clamps that will fill this need are the Ivory 12 A and 13 A
(Fig. 2), but to he usable, these clamps must he altered by cutting away the
wings and refining the jaws. My choice for a lower molar clamp is an S. S.
White No. 26 (Fig. 1). Rare, indeed, is the time when one of these four clamps
cannot be used with rigidity and firmness on any one of the molar teeth.
OUTLINE FORM
It is not my purpose in this article to give a technique in
sequence for the Class III or Class V gold foil operations but rather to assert
and emphasize certain fundamentals which are a part of these steps.
Nothing is more fundamental to gold foil restorations than
cavity outlines, but they are abused so frequently. Many uninformed dentists
have told me in an apologetic manner that their patients would not permit gold
to be placed in the front of their mouths. I usually tell them that they are
talking about fillings which are so shaped that they reflect light as intensely
as a small headlight. I am discussing a restoration for treating initial
caries that is so line-like and in such perfect harmony with the tooth that it
is not noticeable. In teeth where extensive caries make this impractical, a
compromise can be made, and baked porcelain inlays can he used. Many fine
porcelain inlays still give good service after 25 years.
Great care should be exercised in establishing the outline
form for a Class III gold foil, and it should be completely accomplished before
work is done on the interior form of the cavity. A delicate, keenly sharp, 11.5
mm. width, reverse bevel chisel is used to form an abrupt curve in the incisal
one-third, and a straight line margin is carried toward the gingiva to join the
straight gingival outline. The gingival margin is placed just beneath the free
margin of the gum tissue, and the straight labial line is in harmonious
parallel relation to the lobe of the tooth. This Class III outline should he so
line-like and so parallel to the lobe of the tooth that it takes careful
observation to be seen. The outline form is conservative and yet, with slight
separation, the cavity can be filled from the labial surface for the major
portion of the malleting. The lingual outline form is cut in a similar manner to
join the gingival margin with a shoulder. The linguogingival shoulder and the
lingual surface is malleted from the lingual side of the tooth.
Too little time, consideration, skill, and care is given to
the outline form by nearly all gold foil operators. Initial caries occurring'
in 'the distal surfaces of central or lateral incisors or cuspids can be
restored with gold foil and should never be objectionable. Yet, if the outline
form is slightly out of harmony, overcut, or with irregular margins, the completed
foil will rightly bring unhappiness to a patient with a pride in appearance. A
skillful dentist also need feel no hesitancy in filling initial caries in the
mesial as well as distal surfaces of anterior teeth with gold foil.
INTERIOR CAVITY FORM
The interior form of the cavity consists of an axial wall
encompassed by labial, lingual, and gingival walls with their line angles and
point angles. The retention is provided between the gingival wall and the
incisal angle. It is fundamental in the instrumentation of the Class III cavity
preparation that the hoe, angle formers, and axial wall plane be used in a
cutting manner with the blade parallel to the wall, rather than by a digging
action.
MALLETING AND CONDENSING GOLD FOIL
A few fundamentals in the malleting and condensing of the
Class III gold foil must be respected. The proper condensing instruments must
be used for the specific purpose for which they were designed.
A suitable holding instrument must he used to receive and
hold the first few pellets positioned in the cavity for malleting. The
following sequence of use of condensing instruments is effective: Carlson-type
Ferrier condensers of 0.5 and 0.55 mm. in diameter (No. 1 and No. 2) and having
an angle of seven degrees
permit the dentist to work around the adjacent tooth and to
maintain a proper line of force into the cavity for adequate condensation.
A No. 6 S. S. White bayonet with a 0.5 mm. condensing point
and occasionally No. 8 and 9 Ferrier bayonets can he used to advantage. These
condensers permit the proper line of force to be directed into the
labiogingival point angle and the incisal point angle.
A Ferrier F. foot condenser which has a diameter of not over
0.55 mm, is used to assure condensation of the foil over the cavosurface
margins in areas of difficult access, such as the middle third of the gingival
margin, the linguogingival shoulder, and possibly over the contact area. While
these instruments are fundamental, Dr. Alex Jeffery has designed some bayonet
condensers for use in the invisible Class III foil. These have short nibs and
greater offsets, making them very useful in difficult Class III work.
Gold foil cannot be wished to place. The middle third area
of the gingival wall at the cavosurface and the linguogingival angle at the
cavosurface must be stepped and condensed before the mass of subsequent gold
cuts off the access. To correct an error at this point can be an onerous chore.
CLASS V GOLD FOIL FILLINGS
A fine gold foil filling is the most enduring restoration
for gumline caries or erosion. In only a few mouths are they noticeable and
then only in a wide smile.
The Class V gold foil presents different problems from those
of Class III fillings. The gingival wall of the cavity should be placed
gingival to any evidence of erosion or caries and where it will be covered by
gingival tissue. There should be just enough cementum between the gingival
outline and the labial jaw of the gingival clamp for proper finishing. The mesial
and distal outlines should be placed so that the gingival tissues in the
embrasures will cover or very nearly cover them. It is better for the outline
form of the cavity to be overextended than to be under-extended.
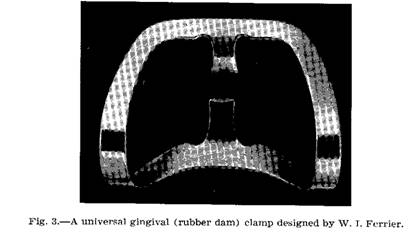
The S. S. White No. 212 gingival clamp (Fig. 3) should be
used universally for all teeth except molars, and even there it will be found
to be very usable. The labial bow of the clamp allows an excellent working
field without interference, and the labial jaw slopes to approximate the
gingival tissue, thus permitting the placing and cutting of the gingival wall
of the cavity. In accomplishing these features, this clamp could not be made to
balance without support. However, with a purposely blunt labial jaw, it may be
slid to place and, while it is held in position, it can be blocked with
compound.
The fundamental instrumentation for Class V cavities
consists of outlining the cavity with a 33 1/2 inverted cone bur. The end
cutting surface is used on the gingival, mesial, and distal walls, and the side
of the bur is used to make the incisal or occlusal outline. The incisal or
occlusal outline may be developed more rapidly by the use of the small straight
diamond wheel. This instrument should not he used in a high-speed handpiece,
however. The walls and interior of the cavity are finished with the Nos. 21,
22, and 23 hoes. The retention in the finished cavity is provided between the
gingival and incisal or occlusal walls and their line and point angles. The
mesial and distal walls are obtuse and flaring from the axial wall to give
proper strength to these portions of the tooth.
For Class V cavities, the straight condensers having
diameters of 0.5, 0.55, and 0.6 mm. are fundamental. It will be noted from
these dimensions that the condensing area of these instruments is very small.
Yet, with accurate stepping, a fast malleting cadence by the assistant, and by
using an easily controlled instrument it can produce a better result rapidly.
All mechanical condensers have annoyingly cumbersome tubes, and a mechanical
handpiece must be tripped in order to step. It matters not how many blows are
delivered; time is lost in the tripping of the instrument. The average Class V
foil should require no more than 15 minutes of hand malleting time. In stepping
the plugger point, it should be watched constantly to avoid possible pits in
the gold from uneven stepping. Each step should overlap the preceding one by
half. The surface of the gold should not he burnished, but it should be
condensed and flowed against the cavity walls for a tight seal. In emphasis I
repeat, the average Class V foil filling will take from 12 to 15 minutes of
hand malleting time. I know of no mechanical condenser using the same size
condenser point that will equal this.
VARIATIONS IN TECHNIQUE
There seems to be considerable interest in several
variations of the standard technique. Among these are (1) the use of mat foil,
(2) the use of large foot pluggers, and (3) the use of new mechanical
condensers. All of these are used for the obvious purpose of saving time.
However, I suggest that fundamentals be thoroughly understood before these
variations are attempted. It would seem to he unjustified for a dentist to carefully
cut a fine detailed cavity with line angles, point angles, and true walls, only
to introduce large masses of gold foil which cannot be condensed completely
into these angles.
Little purpose is served, although it is interesting to make
metallurgical tests of finished malleted foil fillings. Samples made by two
different dentists using the
same technique will show a different result. A specimen
produced on a laboratory bench for the purpose of test will vary, no doubt,
from one produced in the mouth. Therefore, we may assume that whatever the
technique (whether a combination of soft and cohesive foil, mat foil with a
veneer of cohesive, or cohesive foil alone), gold foil must be properly
stepped. It must be condensed with a small plugger point, and it must be flowed
against the walls with the proper line of force to obtain a perfect seal
against the tooth. These are fundamentals.
GOLD FOIL PELLETS
Since time is a fundamental factor in the production of a
gold foil restoration, the dentist can ill afford to use a manufacturer's
pellets. Many years ago, hand-rolled pellets were supplied by the
manufacturer.* The resultant shortage of help (luring the war years caused them
to discontinue this item. However, a skillful assistant, with practice, can
roll a full book of gold foil (one-tenth of an ounce) in an hour and a quarter
so as to produce pellets in four sizes.
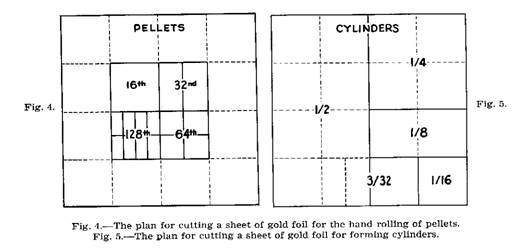
Each book of No. 4 soft gold foil should he first marked and
drawn into 16 1-inch squares (Fig. 4). The full 1-inch square becomes the 1/16
pellet, which is the largest size. To make the 1/32 pellet, one more cut is
made, leaving a piece 1/2 by 1 inch. The next smaller size is the 1/64 which
measures 1/2 by 1/2 inch. The smallest pellet is the 1/128 which measures 1/4
by 1/2 inch.
All of these are rolled in much the same manner. After
separating the gold from the dividing paper, the cotton pliers are used in the
right hand to grasp each piece in the center, crumpling it slightly, until the
corners all turn up as it is placed between thumb and forefinger of the left
hand. With a light touch of the pliers, the corners are tucked into the center
as the fingers gently roll the gold into a ball. Thus, the corners are within
the pellet and not on the outside of the ball of foil.
The J. M. Ney Co., Hartford, Conn.
GOLD FOIL CYLINDERS
The technique for using hand-rolled cylinders to line Class
V cavities is not fundamental, but it is far superior to one of using only
cohesive foil. The advantages are better protection of the margins and reduced
malleting and finishing time. Hand-rolled cylinders for Class V cavity use are
the 1/16 and 3/32 of a sheet of gold in size (Fig. 5). They are made by
creasing the piece of foil with a straight edge plaster spatula and folding it
without pressure several times into a soft ribbon. Starting at one end of the
ribbon with a jeweler's broach, it is rolled without pressure into a small
cylinder. They are used in the Class V cavity by introducing and flattening one
against each of the four cavity walls. Cohesive foil is then placed into the
axial wall and condensed, with succeeding pellets being built up to the proper
form. Subsequently, the remaining soft foil is pinched off over the margins.
The "invisible" Class III foil filling is not
classed as a fundamental. This type of cavity is difficult to cut and difficult
to fill and, while it is not beyond the scope of skillful gold foil operators,
an overemphasis on this type of restoration with its possible uncertain results
may bring discouragement. A technique which is difficult to standardize and not
frequently indicated is not fundamental.
FINISHING THE RESTORATIONS
The finishing of the gold foil filling with the painstaking
care and precision required to restore the original anatomy of the tooth is
more time-consuming than the malleting. Beveled files, knives, and extra long
(18-inch) strips, and sparing use of sanding disks are used for this purpose.
Great care must be exercised to avoid ditching or abrading margins of the
cementum in any way.
In a discussion of fundamentals, the motive involved is an
honorable one. t seeks to call attention to definite procedures and techniques
and an armamentarium which, when used properly, will produce clinically
beautiful enduring restorations. It has no quarrel or conflict with any other
branch of the dental art. ts sole purpose is to bring about the saving of
human teeth.
.
Reprinted from The Journal of PHOSTHETIC, DENTISTRY, St.
LouisVol. 8, No. 6. Pages 1019-1025, November-December, 1958 (Printed in the U.
S. A.)
Scanned and edited by Dr. John R. Sechena