Directions
S. S.WHITE
SEPARATORS
DESIGNED By DR. W. I. FERRIER
Those who have known and valued the Perry separators for
their easy applicability and efficiency will appreciate the practicality of the
improvements represented in the six S. S. White Separators designed by Dr. W.
I. Ferrier.
The theory in design and the principle of power application
of the Perry separator are retained in the new instruments, but the limitations
of the older forms have given way to a new and greater convenience and
efficiency in the present separators.
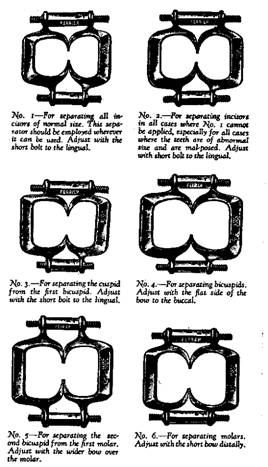
Although each of these separators was designed for the
particular application mentioned for it in the directions that follow, there
will be instances when size and position of the teeth will call for the use of
a separator in locations other than the special application mentioned for it.
For example: Separators Nos. 1 and 2, in addition to separating incisors, can
he used frequently between the cuspid
and bicuspid, and between the bicuspids. Separator No. 3 can be used frequently
between the bicuspids, and No. 4 will find occasional use between the second
bicuspid and first molar.
The good judgment of the operator should be exercised in
these applications of the separators and the separator that fits the teeth and
the arch best, with the least operative interference, should be used.
The fact that these separators have this wide range of
application is a tribute to them. They will gain the space necessary for any
type of filling operation, and for the examination of
teeth for obscure cavities. They will also hold the rubber dam in place without
the aid of ligatures on the teeth that are otherwise difficult to isolate,
especially the lower incisors of young patients separate slowly.
AT NO TIME during tooth separation should the patient
experience much discomfort. Do not attempt to obtain more space than is
actually necessary at the commencement of the operation, because the spring of
the separator will gradually give more space as the work progresses.
Experience has shown that these separators will give all the
separation necessary for any type of operation and do this with little or no
discomfort to the patient, no injury to the investing tissues, if they are
applied according to the technique here outlined.
Under no circumstances should these separators be tightened
to any appreciable extent before being blocked with compound chilled by
compressed air, cold water, or both. This need not take over three minutes
time.
Bring the jaws together by turning the bolts in the direction
opposite to that indicated by the arrows. Place the separator in the mouth,
with the jaws at or near the gingival line, and estimate the distance the
separator jaws can be opened and passed between the teeth without binding.
Remove the separator from the mouth and, by turning the
bolts in the direction indicated by the arrows with the fingers, open the
separator to approximately the estimated distance mentioned in the preceding
sentence. Replace the separator in the
mouth with the jaws at or near the gingival line and, with the wrench supplied
for the purpose, turn the bolts in the direction indicated by the arrows until
the four jaws find a seat upon the teeth far enough gingivally
to avoid any interference.
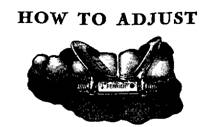
Stabilize the separator by blocking with modeling compound,
as illustrated. This gives the instrument so firm a seat upon the teeth that
any type of work can be accomplished without the least disturbance to the
separator.
From this point on the desired amount of separation can be
obtained by making alternate half turns on each bolt, buccal
and lingual. Caution - Make these half turns alternately, turning one bolt too
many times before turning the other will lock the separator and injure the
threads.