Scanned and edited By Dr. John R. Sechena
The Class II Gold
Foil:
A Flexible and
Durable Restoration
BRUCE B. SMITH
Bruce B. Smith, B.Sc., D.M.D., 110 Cobb Medical Center,
Seattle, WA 98101, U.S.A.
Dr. Smith conducts a private practice full time. He is
past president of the American Academy of Gold Foil Operators and of the
Academy of Operative Dentistry. He is director of the John Kuratli Crown and
Bridge Seminar in Oregon and director of the Bruce B. Smith Crown and Bridge
Seminar in Seattle. He is a member of the American Academy of Restorative Dentistry
and the University Ferrier Study Club.
Considering the current trend of excessive cutting with
high-speed procedures, the Class II foil is a welcome conservative operation
that gives the patient one of the best services known to dentistry.
Carious lesions found in dental practice today are
frequently smaller than those found in the past. This may be attributed to
fluoride in drinking water and dentrifrices, and to better control of plaque.
As a result, more than ever before, small restorations are indicated. Unfortunately,
the ease of cutting teeth with ultra-speed burs and the accuracy of elastic
impression materials has tended not only to make gold inlays more popular, but
has even encouraged the use of full crowns instead of inlays.
In dentistry the greatest art is to conceal art and thus
allow the patient a pleasant, natural smile. If delicate and precise foil
operations are performed, it is only when the dentist picks up his mouth
mirror to examine the teeth that he is suddenly aware of the fine care the
patient has received through the years. With foil, patients have received the
finest possible service. They have been allowed to keep more of their hard
dental tissue. They have restorations with the finest and most permanent margins
known to restorative dentistry. This is conservative dentistry at its best.
For a Class II cavity the most conservative restoration is a
gold foil. Gold foil restorations require less destruction of tooth tissue than
do gold inlays. Good candidates for Class II gold foil restorations are
bell-crowned teeth with large undercut areas which could distort flexible
impression material; rotated teeth; and teeth with a sound previously placed
gold foil or gold inlay in the opposite proximal surface.
The Class II gold foil can and should be a service provided
by every dental practice of high quality. The purpose of this article is to describe
the author's concept and technique of the Class II gold foil operation with the
hope that the information will help others to a greater facility with the
procedure.
Cavity Preparation
Open the cavity through the occlusal pit with a No. 170
carbide bur at ultraspeed. Establish occlusal outline and prepare a proximal
'T'. The bur proceeds gingivally on the proximal and runs out through the
enamel to allow a visual depth guide. Here the bur weakens the walls enough for
later planing with chisels or enamel hatchets. After establishing the gingival
wall, replace the bur with a shortened No. 170 carbide bur which, at slow
speed, provides a more accurate depth guide in refining the occlusal portion.
This bur will automatically give the necessary divergence to the buccal and
lingual walls of the isthmus. Plane and refine the buccal and lingual walls of
the proximal portion with enamel hatchets of suitable size or binangle
chisels. These instruments may also be used to sharpen the occlusal outline and
give proper divergence to the wall adjacent to the marginal ridge. Frequently a
Wedelstaedt chisel assists in refining the outline. Define the sharp occlusal
angles with an inverted cone bur held at an angle and with slow speed. The
rotation of the bur may be reversed from one side to the other to prevent
"runout." The proximal walls should twist slightly as they approach
the gingival to give a complete boxing. This boxing may be enhanced, if
desired, by accentuating the axioproximal line angles by turning the enamel
hatchet slightly. Another instrument useful for gaining this effect, particularly
in cavities on the mesial of the mandibular first bicuspid, is the gingival
margin trimmer, as well as the miniature gingival margin trimmers No. 28° and
No. 29°. These are the same instruments, designed by C. T. Fleetwood, which are
so indispensable in preparing Class III cavities for the lingual approach. The
fine finishing of the walls of the preparation should be done with very sharp
instruments (Hamilton, 1975). The use of these will automatically impart a
slight bevel and will correct any slight irregularities in outline form.
To be most effective, the instruments should be sharpened
frequently while in use. The gingival wall is not beveled in the Class II foil
preparation, as the soft foil which will rest against this wall must be properly
supported.
There is a slight variance in the cavity preparation in the
mandibular and in the maxillary arches. This variance is based on the dental
anatomy of the area, that is, the position and size of the teeth, and
especially the form of the embrasures. The variance also allows the operator to
take advantage of the flexibility of the material. In the maxillary arch, the
lingual embrasure opens occlusally from the gingival and greatly diminishes the
amount of lingual extension needed. Practically, the effect on the outline form
is to make the gingivolingual angle an acute angle, whereas the buccal is
usually a right angle. The reverse is true in the mandibular arch where this
effect is on the buccal aspect instead of the lingual. An exception, however,
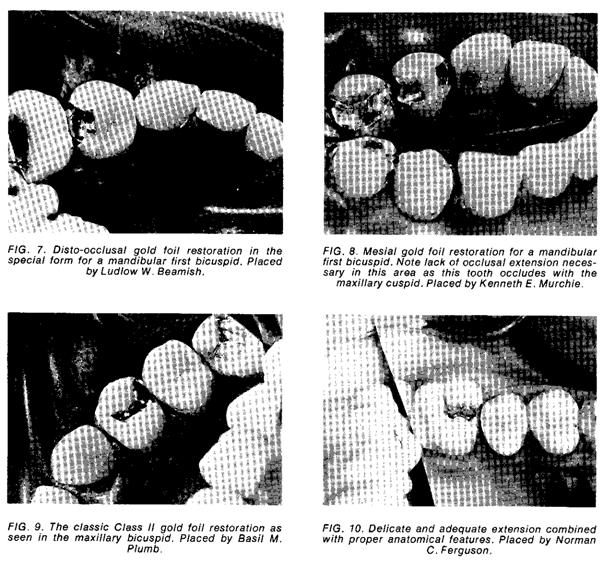
is the mesial of the mandibular first bicuspid. Here tooth structure may be
saved on both the buccal and the lingual with acute angles used at both
gingival angles. This is possible because of the shape of the adjacent surface
of the mandibular cuspid. Indeed, the form of the mandibular first bicuspid is
like a cuspid in the mesial half and a bicuspid in the distal half. Because of
this and because there is no occlusion on the mesial (as its antagonist is the
maxillary cuspid), no pulpal wall is necessary in the normal mesial cavity.
The distal cavity on this tooth is also prepared in a
special manner. Here an occlusal step is necessary but, due to the large buccal
cusp with the accompanying pulpal extension, it is wise to slope the pulpal
wall occlusally as it extends to the buccal, affording greater protection to
the pulp.
The occlusal outline in all the Class II preparations for
foil need not be overly wide but should present a small and neatly cut dovetail.
At one time, in the 1930s, some dentists were making excessively small occlusal
outlines, so restricted as to make the strength of the restoration almost
marginal. Through the years it has been observed in study clubs that some
dentists gradually drift in their preparation forms and procedures to a point
where they may over accentuate, or even over restrict, certain forms. When this
has occurred and the error become apparent, or is mentioned by the


 instructor, the
correction is made and the extension, or the pendulum so to speak, swings back
to a normal area. Normally, the occlusal outline presents a slight reverse
curve at the bucco-proximal area with the linguo-occlusal outline being almost
straight, for with foil one does not face quite the same problem as in seating
a single-step inlay. With the inlay, no retention other than the dovetail is
used. Here, if the linguo-occlusal does not have an adequate dovetail form to
match that on the buccal, the hydraulic pressure of the cement may cause a
slight linguoproximal displacement when the inlay is seated. The foil, on the
other hand, has slight but definite retentive areas placed at the expense of
the lingual and buccal walls where they reach the slightly divergent wall of
the marginal ridge. These areas also help in starting the occlusal phase of the
foil.
instructor, the
correction is made and the extension, or the pendulum so to speak, swings back
to a normal area. Normally, the occlusal outline presents a slight reverse
curve at the bucco-proximal area with the linguo-occlusal outline being almost
straight, for with foil one does not face quite the same problem as in seating
a single-step inlay. With the inlay, no retention other than the dovetail is
used. Here, if the linguo-occlusal does not have an adequate dovetail form to
match that on the buccal, the hydraulic pressure of the cement may cause a
slight linguoproximal displacement when the inlay is seated. The foil, on the
other hand, has slight but definite retentive areas placed at the expense of
the lingual and buccal walls where they reach the slightly divergent wall of
the marginal ridge. These areas also help in starting the occlusal phase of the
foil.
As indicated previously, the proximal walls should be well
boxed to the gingival, but actual retentive areas here are seldom necessary,
particularly if one has not extended too far into the proximal embrasures.
Overextension here can make the condensation of the foil into the proximal
much more difficult, allowing the gold to slip out of the cavity under occlusal
pressure if extra care is not used. William H. Gyllenberg has demonstrated, in
contrast to J. M. Prime's statements, that retention areas on the proximal
walls may be justified when needed and that the foil readily enters these
areas. However, these retention areas should be placed thoughtfully and
delicately to ensure strength of the walls (Fig. 1).
Locks in previously placed restorations, whether foil or
inlay, may be used to secure the occlusal of a later Class II foil, assuming
that one has thoroughly examined the existing restoration and found this
procedure to be advisable. This must be done with some consideration. In a
bicuspid, the size of the occlusal area involved is very important because of
the limited amount of tooth structure. If the union is to be made with a
single-step inlay, one must not destroy the dovetail retention of the inlay nor
break the cementing agent. Usually, the occlusal depth of the existing inlay
will vary sufficiently from the design of the foil so that one may create
adequate retention for the foil without damaging the dovetail of the inlay. A carbide
bur used at slow speed here will be less damaging to the cement bond than at
high speed.
When the union is to be established with another gold foil,
the problem is simplified and

 can be achieved
simply and directly. The occlusal of the existing foil is cut with a long
bevel from buccal to lingual and the new restoration placed with a matching
bevel. The wedging action of foil and the compressibility of dentine result in
a strong and permanent restoration with the outline form of a normal M.O.D.
can be achieved
simply and directly. The occlusal of the existing foil is cut with a long
bevel from buccal to lingual and the new restoration placed with a matching
bevel. The wedging action of foil and the compressibility of dentine result in
a strong and permanent restoration with the outline form of a normal M.O.D.
Condensation
A fine cavity preparation is the foundation of a good restoration,
but the condensation procedures make the foil a success or a failure.
It is almost axiomatic that it is much easier to condense
foil well on mesial preparations and to finish it more expeditiously on distal
preparations. The angle of condensation is more natural on the mesial and
requires less use of the highly offset bayonet condensers. In addition, it is
easier to detect any marginal or gingival deficiencies and to correct them more
easily. One of the most common problems is the failure to condense the gold
completely into gingival angles.
Although it is a little slower and more awkward to fill
distal preparations, they have one distinct advantage in that the finishing strips
and disks tend to lay in to the tooth and finish the gold more quickly and with
greater efficiency. Electromatic or pneumatic condensers are very useful in
obtaining the proper angle to condense the gold along all buccal walls as well
as along the mesial wall on distal cavities.
Condensation or compaction is the heart of all foil work,
especially so in the Class II. Though an all-cohesive gold technique may be
used, the most efficient method, both from the standpoint of excellent
adaptation of the gold to the walls and from the standpoint of time consumed,
is the use of noncohesive cylinders. Usually three hand-rolled cylinders are
used (see Figs. 2, 3, & 4); typically, two are made from one-eighth of a
sheet, and one from one-quarter, using No. 4 gold (four grains to a sheet). The
one-eighth cylinders are swept firmly into position along the proximal walls
and into the gingival angles with the Nos. 13 and 14 parallelogram condensers.
The one-quarter cylinder is shaped into a wedge with the college pliers and
pressed directly between the two eighths. The mass is condensed vertically,
using the No. 10 square bayonet condenser of the Ferrier Study Club set. It has
been our experience that this large square
bayonet is sometimes a little too large for convenience.
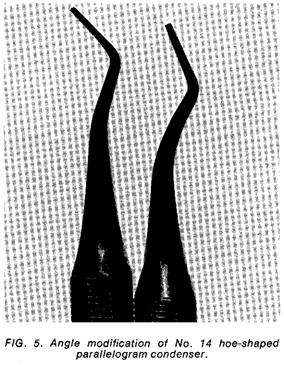
Occasionally a modified No. 13 or No. 14 parallelogram condenser, particularly
the hoe shape (No. 14), will give better condensation and access into the
cavity (Fig. 5). To modify this instrument, one decreases the angle to the
shaft from 12 centigrades to 6 or 7 centigrades. (This is the same angle
employed in most binangle chisels, whereas the 12 centigrade angle is used
primarily in hatchets and the Nos. 41 and 42 modified Gillette type chisels.)
Hand malleting is employed and the soft noncohesive foil should, when
condensed, reach a height two-thirds that of the normal axial wall. This allows
room for the following cohesive foil to aid in the retention of the proximal
and to form a solid contact point.
The cohesive gold should be placed in a sloping manner,
first up the lingual wall and then up the buccal wall, with a slight wedging
effect. The vertical condensation should step out slightly beyond the
cavosurface angle to give good union with the noncohesive gold and to give
proper adaptation to the walls. The con-tact point should be well formed and
condensed against the adjacent tooth. A matrix has no place in this technique,
as lateral condensation later with foot condensers (both the large
interproximal types and the small No. 12 or F condensers) will use the excess
gold to gain density and good coverage in finishing the proximal and gingival
margins. A Searl swager will confirm the condensation.
It cannot be overemphasized that overextension proximally
can allow noncohesive cylinders to slip out of the cavity; and, because it makes
it easier for the operator to place foil on the lingual, he tends to add an
excessive amount. Time is wasted not only in adding the excess gold but often
to a much greater extent in reducing it when finishing.
Proper layering of the gold buccolingually as described by
Black (1908) is of great assistance in adaptation to walls in the occlusal
area also. Yet care should be exercised not to produce an excess of wedging and
pressure as this can cause hypersensitivity or even crack teeth.
In considering these biologic factors, the sound precautions
that one usually takes in operative procedures are of course required. Adequate
pulpal protection from thermal shock during preparation should be provided as
well
as suitable bases or medicaments to prevent postoperative
complications. Most foil cavities are not extensive; however, gum copal varnish
and cement bases should be used when necessary. If a large base is needed, one
should consider the condensing pressures on the base. Sometimes a stronger base
of zinc phosphate cement with alloy fillings is indicated.
Finishing
Finishing is a discipline; it is a series of good habits set
into a progressive rhythm; it is the reward for previous conscientious and
careful detail. In other words, finishing is the payoff. It is not vacillation,
or back-and-forth corrections which waste time, effort, and tire the patient.
It is essential to the work that has gone before.
After condensation, all areas should first be burnished to
explore the possibility of pits or undercondensed areas. These, of course,
should be corrected. Special burnishers, such as an extra-small type and a
T-shaped form, are often helpful. The Spratley burnisher is usually helpful
later to accentuate grooves and to shave off excess fins. A sharp cleoid or discoid
is also good.
At this point, it saves time to disk all available areas,
including the proximal, to remove excess gold. Fine or medium garnet disks
should be used in the proper angles to help set the planes of the cusps and
grooves.
Now the anatomy which was carefully built in during
condensation is accentuated with a shortened No. 700 or 170 bur, moistened and
at slow speed. This will set the central groove and the escape gate through the
embrasure. The opposite side of the occlusal may be finished to margin the
same way, but frequently a slightly larger round bur such as a No. 4 will run
along the margin and remove the excess gold without cutting the enamel as a
stone could.
When finer disks complete the surfaces except for polishing,
it is time to place the separator, usually a No. 4 or 3 Ferrier. The separator
should be a finely proportioned, delicate instrument with which the operator
can feel and see the separation of the teeth.
The jaws should be reduced to minimal but uniform dimensions
where maximum clearance is obtainable in using gold knives, files, disks, or
strips. So that we can feel the separating action upon the teeth, the screws
of the separator must be free and not bind in their tracks (Fig. 6). There
should be enough "play" in the instrument so that a definite
looseness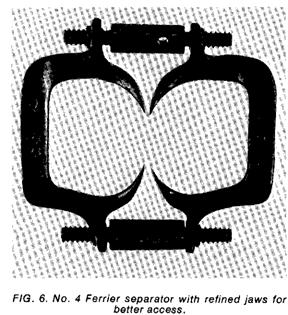
will allow minor adjustments in positioning the separator
more easily to the teeth.
The separator is applied in a passive state and stabilized
with compound to avoid tissue damage. The compound also aids in distributing
the pressures over several teeth. Only slight separation is necessary as the
teeth have already been forced apart a little during condensation. Usually a
strip of matrix band may be slipped through the contact area and worked back
and forth buccolingually to shape the gold a little and give clearance for an
abrasive steel strip. But, if the contact is extremely tight, a Gordon-White
saw or Kaber saw will cut through to initiate the action of the strips.
Inasmuch as the unfinished gold has assumed the shape of the proximal of the
opposite tooth, if the strips are first started with a reverse pull toward both
sides of that tooth, they will start more easily. As the extra-long, garnet,
medium cuttle, fine, and extra-fine linen strips bring the surface to contour,
they should be relieved at either the buccal or lingual to maintain proper
contact point and embrasure form. An adequate amount of cooling air should be
applied during these procedures and the result should be a beautifully finished
and finely polished interproximal surface.
The marginal ridge and occlusal embrasure require special
attention. A sharp gold knife or cleoid may be drawn across the embrasure to
relieve the acuteness, followed by a large 7/8-inch, extra-fine cuttle disk
which will bypass the frame of the separator easily and leave a smooth and
rounded ridge. The separator is now removed, after being in place only a short
time.
Final polishing is achieved with lap emery No. 303 and
optical rouge No. 309W. These are manufactured by the American Optical Company
(San. Francisco, CA 94119, U.S.A.) and have been popularized and introduced to
dentistry by Gerald D. Stibbs.
Finished restorations are illustrated in figures 7-10.
Durability of Foil
The durability of foil is legendary through dental history.
Class II foils, with their narrower occlusals, serve patients through their
lifetimes. As an example, one of my patients, who recently died at age 70, had
had all bicuspids restored with Class II foils, all eventually
M.O.D.s in form. Many had been placed during his early
thirties. He was fortunate to have retained a full dentition, without partial
dentures or bridges. The cause of his death was sarcoma of the liver. Surely
fine operative dentistry through the years contributed to his comfort,
health, and ability to nourish himself.
Common Faults
Some criticism of Class II foil operations may help in our
quest toward better service for our patients. Common faults are deficiencies at
the gingival angles, ragged outlines, and undercondensation. One seldom sees a
loose Class II in contrast to the occasional Class III, and some dentists
prefer the Class II on state board examinations for this reason. Another
occasional fault is failure to gain the proper angle of condensation and
correct inclination of the gold to a wall which can result in improper adaptation
and voids or leakage. The proper layering and wedging effect of the gold and
the proper angle of the condenser will ensure a tight seal and the finest
margin in dentistry (Smith, 1959).
Conclusion
Let us remind ourselves, to quote Ferrier (1959), that a
tooth is an organ of the body not capable of regeneration. Conservation of
dental tissues, hard or soft, is in the best interest of our patients. Gold
foil is far superior to an inlay if excessive stress is not a factor. The
margins are the finest known. Gold foil is less costly than an inlay which
requires not only laboratory time for its creation, but also a second session
of clinical time for seating it. For the patient, a gold foil means no second
appointment, no second administration of local anesthetic, and no second
application of the rubber dam. The patient receives better service and the
dentist adequate compensation. We should consider this operation a flexible and
durable adjunct to our therapy.
REFERENCES
Black, G. V. (1908) Operative Dentistry, Vol. 2. Chicago,
III.: Medico Dental Publishing Co. Pp: 271-272.
Ferrier, W. I. (1959) Gold Foil Operations. Seattle:
University of Washington Press.
Hamilton, A. Ian (1975) Cavity walls and margins. The
Journal of the American Academy of Gold Foil Operators, 18, 22-28.
Smith, Bruce B. (1959) Finer operative dentistry with
minimal tooth destruction. Journal of the Southern California State Dental Association,
27, 6-10.